at home

Wednesday, December 4, 2019

6 Months in Our First Home — An Update!

Remember 6 months ago when I said we bought a house, and I'd be back to share all of the exciting renovation updates?? Turns out updating a home while you, like, have a job and stuff doesn't go so quickly. 😆


We've been making progress, but Austin's had a pretty busy work schedule with his company (including a trip to Africa), and we've taken some weekends off of housework since we want to live a little, too. The good news is, even with our house not even close to being finished, it already feels like home. This makes updating it even more exciting because it can only get better!


I wanted to take a little record of what's been done over the last 6 months, in case you're trying to do some house projects while you live a little, too. Real life isn't an hourlong episode of Fixer Upper, and that's totally OK! The photo above was literally taken the day we moved in, and it hasn't changed much since. Ha! We're planning to update some of our living room furniture, and I'm excited to share this space when it feels "done"—but here it is now. This is still pretty much the only room that's totally settled, which I'm weirdly OK with as long as I have *one* space that feels really homey. 🙂 This is also the room that we tore wood paneling out of, and I'm SO glad we did.


This photo above is from the first spot that I styled, and if you look close, you'll notice we still need to replace the old trim. This is in the same part of the house as the photo of me and my dad from my last house post!


Austin and I are considering this "phase 1" of our renovation project, and we're lucky to be saving some money by doing a lot of it ourselves—and with help from Austin's dad! To finalize this phase, we need to finish laying our wood floors (we're inches away!), replace the trim, and update some old doors. Once we're finished with phase 1, phase 2 (plus phase 3, 4, 5? We've only named phase 1 😂) will include updating the two bathrooms in the house and the kitchen. Eventually we want to do some landscaping and paint the outside of the house, but we're currently focusing on what's inside the house because that more directly affects us. (Sorry, neighbors!)

Here's another process shot of Austin prepping to hang a mirror. Just need to finish the trim here + get a new door, and the entryway will be DONE! Feels good to check things off the list.

Anyway, that's what's been going on in our neck of the woods! Looking forward to spending the holidays at home this year—maybe even with a new fireplace mantle to hang our stockings on. ❤️

Sunday, June 30, 2019

One Last Look at the Loft

Whew! What a weekend.

We moved from the loft to our new house (!!), and it was exhausting and wonderful all at the same time. I really expected to have a lot of sad emotions leaving the loft. After all, it's the place where I entered as a roommate with my dear friend Merry and left my years there as a wife to my other half, Austin. We filled those exposed-brick walls with lots of laughter, Friends reruns, happy tears and sad ones, Chipotle burrito bowls & how could I forget the Jordan Valley fireworks on those summer nights that honestly felt magical.

Anyway — surprisingly — no sad tears. Just an extra-long sigh of gratitude.


Tuesday, June 18, 2019

Our First Home Renovation!


In case you missed our big news (which you probably haven't if you follow me on Instagram), we bought our first home about a month ago! Annnd it's been the setting for nearly all of our nights and weekends since then. When we were on the house hunt, we knew we wanted to find a home that had good bones (such an HGTV phrase!) but needed a little love, and we're thrilled with the one we found.

We bought a ranch style home built in 1970, located in Springfield's Brentwood neighborhood. We're quite a bit further from our downtown offices, which we've become pretty accustomed to being close to, but I am unspeakably excited about living near TREES! Tall ones, too! We're really looking forward to having neighbors on our street and a few blocks away, including some great ones we're already lucky to call friends.


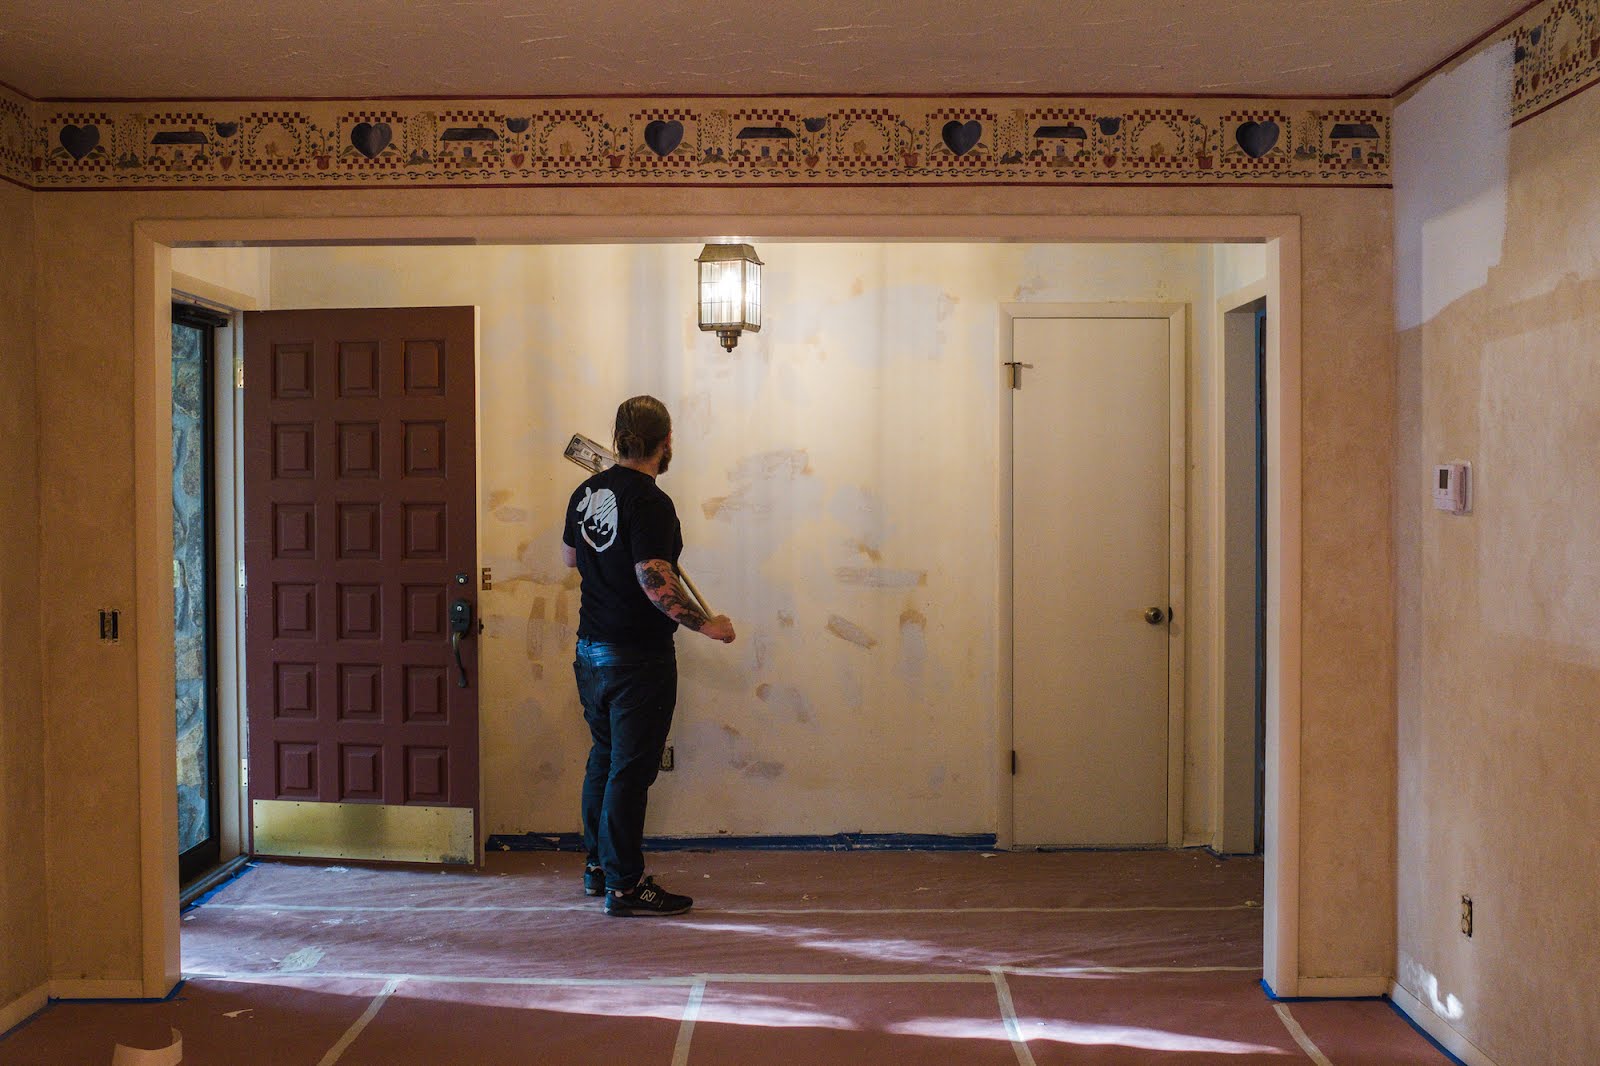
When we bought the house, there was wood paneling in the main living area, which we ripped out on day one and replaced with new drywall. On top of that, there was a wallpaper border in almost every single room, and some rooms even had floor-to-ceiling wallpaper! We spent a good chunk of time peeling wallpaper, and it's almost completely gone at this point. We've had to do some patching up on the walls since tearing out the wallpaper — mudding, sanding, etc., and that's what Austin's doing here.


Before we move in just a couple weeks, we're hoping to have all the walls painted (white!) and we'll be replacing carpet in the bedrooms with wood floors to match the main living areas. We likely won't get all of the floors in in time, but the look and feel of our house has already changed so much in what feels like a really short amount of time.

I'll of course share before & after photos once we've made some more progress, but I wanted to give a little look at the in-between because that's the stage we're in right now, and it's the one that sometimes goes undocumented! Figured I should highlight the blood, sweat, tears & less sexy portion. 😉


Thankfully, our hard work hasn't felt as hard thanks to all the great help we've had, especially from my father in law, Tim. A HUGE thank you to our family and friends who have been so helpful as we've been renovating and preparing to move! Whether you've texted us, brought us coffee, sat and listened to us talk about our house reno, let us borrow tools, peeled wallpaper, painted, etc. etc. etc. we're beyond grateful.

Next comes the really fun part — picking out fixtures, furniture and decor to make it feel even more "us", and I'm excited to see where this stage takes us. I've been chronicling most of this on my Instagram stories, so if you're curious to see more of our progress, you can find that on my highlights!

Oh, and if you want links to any of my outfits in this post JUST let me know 😝💕

Friday, January 26, 2018

Quick Tips for Making Your Flowers Last Longer

I don't know a single person who dislikes receiving flowers. Flowers are happy! And while fresh cut blooms are relatively low maintenance, there are a few things you can do to make them last longer. Here are a few tricks I've used at home to make these pretty sprouts last a week or more:


1. Cut the stems on an angle
Typically, you'll have to give flowers a little trim before arranging them in a vase. When you do, cut the stems diagonally with a pair of shears. This maximizes the surface area of the stem that's submerged in water, and it helps the flower absorb the nutrients it needs.

2. Shears, not scissors
So this one isn't a deal-breaker if you don't have shears, but typically, florists don't recommend using household scissors on these tough stems. The reason is, classic household scissors aren't strong or sharp enough to easily cut the stems, which can lead to a poor cut — and then your bloom gets less water. On second thought, it's probably not very good for your household scissors, either.

3. Change the water frequently
This is a biggie. If you've ever washed out a vase, you know flower water isn't always the most clean or best smelling. To keep it fresh, change water every day (or at least every 2-3 days), and remove any flowers that are looking limp. You'll keep the vase's ecosystem clean and the bulbs that are blooming will last longer.


4. Use lukewarm water... most of the time
Florists usually recommend lukewarm water, but I also learned a trick from my friend Cassie at the Ozark Mtn Flower Truck. If you have a bloom that you're wanting to live a little longer, you should use cold water to revive it — even going as far as to put an ice cube or two in the vase! I had never heard that before she told me, and it has worked so well.

5. Consider flower food
If you buy grocery store flowers, or stems from a flower truck, they'll usually include a packet of preservatives — or "flower food". If you find yourself with a gorgeous set of blooms but no flower food, I read a recipe for making your own plant preservatives here. I spotted the above grocery store flowers at my friend Alex's house, and I couldn't resist taking a few photos of 'em. Too pretty!

What are your favorite flowers to keep at home? I'd love to hear. xo!


Friday, September 1, 2017

Mint and Citrus Sun Tea

Welp, friends. Labor Day is coming up, which means everybody who loves fall will be crushing my spirits on the daily, with reminders of #PSL, pumpkins, Christmas and this meme. Hobby Lobby has already gone and done it by stocking Thanksgiving supplies. What nerve!


Anyway, you already know I love summer. But did you know I love making sun tea in the summer???? Maybe you did. Maybe that's obvious. Maybe it takes one look at me to say, "hey, that looks like a lady who loves making sun tea in the summer." I wear my heart (food) on my sleeve.


Ok, ok. Here's the recipe and such. I highly recommend you make sun tea before the sun begins to set too early — it's the easiest, and it makes you feel like a champ when you have a whole pitcher of tea to drink!

Ingredients:
- 2 family sized tea bags (or one per quart of water). If you're using regular, smaller tea bags, the general rule of thumb is about 8 bags per gallon of water.
- Water
- 1 lemon, sliced
- 3 sprigs mint


So then you slice up that lemon and add mint, tea bags and water to your pitcher. That's it! Go put the pitcher outside in direct sunlight (preferably in a pretty garden), and leave it for about 3 hours. You could go to a hair appointment and come back in that time if you wanted, or you can supervise your tea. It probably won't move, but it might.

....And, voila! It's tea!


Enjoy for 5-7 days, if it lasts that long! The lemon and mint add the best flavor to this tea, so you may not even need a sweetener. If you do, I recommend just a dash of honey. Hope you enjoy the tail end of summer! xo